Statistics
*Paid plan only
With IMQA MPM statistics, you can retrieve previous data of various subjects using periods and conditions for observance and analysis. You can analyze the user data distribution for each performance index along with the user’s environment, or obtain the overall app status and insight.
1. Distribution Analysis
Distribution Analysis allows you to analyze the distribution of user data for each performance metric along with the user experience. After viewing the overall average performance in the Dashboard, you can drill down into specific bins with performance degradation in 30-minute increments.
The IMQA MPM Distribution Analysis page consists of the following:
❶ App version/Timeline ❷ Performance rating graph ❸ User information ❹ Performance heat map
App version/Timeline
You can set the date and time (in 30-minute increments) you want to analyze. When you make changes, Performance Distribution Graph and User Experience will be updated as per your preferences.
❶ App version Select the app version you want to count. Update the timeline when changes occur.
❷ Timeline You can change the date and time (in 30-minute increments) you want to analyze. When changes are made, the performance heatmap is updated based on the selected criteria.
❸ Analysis Date Defaults to “Today." You can change the date by clicking [<] [>]. Can select a date up to 30 days ago.
❹ Selected time zone Displays the selected time zone. You can change to a different time zone.
❺ Current time zone Displays the time zone that includes the “current time”.
❻ Legend Color density is displayed in 4 steps according to the number of aggregated data by time zone.

Performance rating graph
Displays the user data distribution for the selected 30 minutes as a histogram. You can analyze User Experience and Performance Heatmaps by selecting a bin in the Performance Distribution Graph area.
❶ Performance Metrics You can change the performance metrics to “Native UI Rendering Time”, “WebView UI Rendering Time”, “Native Response Time", “WebView Response Time." When you change the metric, Performance Distribution Graph and User Information will be updated accordingly.
❷ Histogram The histogram shows the class on the horizontal axis and the frequency on the vertical axis. It creates classes by setting several sectors for aggregated data and expresses the frequency with the number of data belonging to each class. The histogram is useful for understanding or comparing the frequency status of an entire population.
Native UI rendering time
Rendering time(ms)
0 ~ 5,000ms
Number of collected data
WebView UI Rendering Time
Rendering time(ms)
0 ~ 5,000ms
Number of collected data
Native Response Time
Response time(ms)
0 ~ 10,000ms
Number of collected data
WebView Response Time
Response time(ms)
0 ~ 10,000ms
Number of collected data
CPU
CPU usage(%)
0 ~ 100%
Number of collected data
Memory
Memory usage(MB)
0 ~ 100%
수집된 데이터 수
❸ 50% baseline Displays the average performance baseline. Showing the median of the overall data distribution, it is useful for understanding overall performance. A baseline closer to zero indicates faster performance.
❹ 95% baseline Displays the baseline of bottom 5% performance. Shows where the bottom 5% of the overall data distribution begins, useful for identifying the lowest performing data. A baseline closer to zero indicates faster performance..
❺ Analyzable Bins You can select bins separated by a baseline to drill down into performance data. Filter user information by the selected bin and display a performance heatmap. You’ll see up to three bins. Bins can overlap because they are divided based on the location of the data. In this case, a bin with higher % is shown.
Bin 1: 0th to < 50th percentile in the total data distribution
Bin 2: 50th to < 95th percentile in the total data distribution
Bin 3: ≥ 95th percentile in the total data distribution
You can check the performance environment of the app user by referring to the performance rating graph. If most of the users are distributed in the threshold range, we can see that the app is used smoothly. If they are distributed widely, it means that the app is not optimized for various user environments. You can use this information as an improvement index to set the target performance of the app.
User information
The information is displayed for the bottom 5% section of basic performance and the selected one-day user environment is displayed in percentage. This information is updated when a section is changed in the performance rating graph area.
Screen: Displays the screen of the user data aggregated from the selected section.
OS version: Displays the OS version of the user aggregated from the selected section.
Device: Displays the device of the user aggregated from the selected section.
Location/Carrier: Displays the location and the carrier of the user aggregated from the selected section.
Process: Displays the process information aggregated from the selected section.
GPS: Displays the GPS status of the user aggregated from the selected section. The GPS status is classified into “On” and “Off”.
Performance heat map
Displays the performance heat map that is related to the selected performance index standard. You can check the heat map for native UI rendering time, WebView UI rendering time, fragment rendering time, response time, event, and crash. For more information on the heat map by performance index, refer to “IMQA MPM User Guide > 4.6. Performance heat map”.
Fragment rendering
*For Android app only
You can check the fragment rendering time for the Android app. If you click a desired cell in the heat map area or select a section by dragging the mouse, the “Detailed performance analysis” pop-up window will be displayed.
UI rendering time: Calculates the fragment UI rendering time as a section.
Legend: Color density is displayed in 3 steps according to the ratio of aggregated data in the same-time axis.
Native Response Time
You can check the HTTP response time of the Native screen in question. If you click a desired cell in the heat map area or select a section by dragging the mouse, the “Detailed response analysis” pop-up window will be displayed.
Response time: Calculates the HTTP response time as a section.
Legend: If the collected HTTP is in 4xx, 5xx status codes, it will be displayed in red. Otherwise, it will be displayed in blue. Color density is displayed in 3 steps according to the ratio of the data collected in the same-time axis.
◼︎ 4xx, 5xx status codes ◼︎ etc.
WebView Response Time
You can check the HTTP response time of the WebView screen in question. If you click a desired cell in the heat map area or select a section by dragging the mouse, the “Detailed response analysis” pop-up window will be displayed.
Respose time: Calculates the WebView rendering time in question as a section.
Legend: If the collected HTTP is in 4xx, 5xx status codes, it will be displayed in red. Otherwise, it will be displayed in blue. Color density is displayed in 3 steps according to the ratio of the data collected in the same-time axis.
◼︎ 4xx, 5xx status codes ◼︎ etc.
Event
You can check the event speed that occurred on each screen. If you click a desired cell in the heat map area or select a section by dragging the mouse, the “Detailed performance analysis” pop-up window will be displayed.
Speed: Calculates the event speed as a section.
Legend: Displayed in red for 4xx and 5xx status codes, and blue for 2xx and 3xx status codes. Color density is displayed in 3 steps according to the ratio of the data collected in the same-time axis.
◼︎ 4xx, 5xx status codes ◼︎ etc.
Currently, the event heat map is supported by the Android app only.
Crash
You can check the number of occurred crashes by screen. If you click a desired cell in the heat map area or select a section by dragging the mouse, the “Detailed performance analysis” pop-up window will be displayed.
Crash: Counts the number of occurred crashes on the screen as a section.
Legend: Color density is displayed in 3 steps according to the ratio of aggregated data in the same-time axis.
Resource heat map
Displays the performance heat map that is related to the selected performance index standard. You can check the heat map for CPU, memory usage, and network I/O. For more information on the heat map for resource usage, refer to “IMQA MPM User Guide > 4.6. Performance heat map”.
Network I/O
You can check the traffic usage. If you click a desired cell in the heat map area or select a section by dragging the mouse, the “Detailed performance analysis” pop-up window will be displayed.
Traffic usage: Calculates the traffic usage as a section.
Legend: Color density is displayed in 3 steps according to the ratio of aggregated data in the same-time axis.
◼︎ OS Traffic usage ◼︎ APP Traffic usage
2. Performance analysis
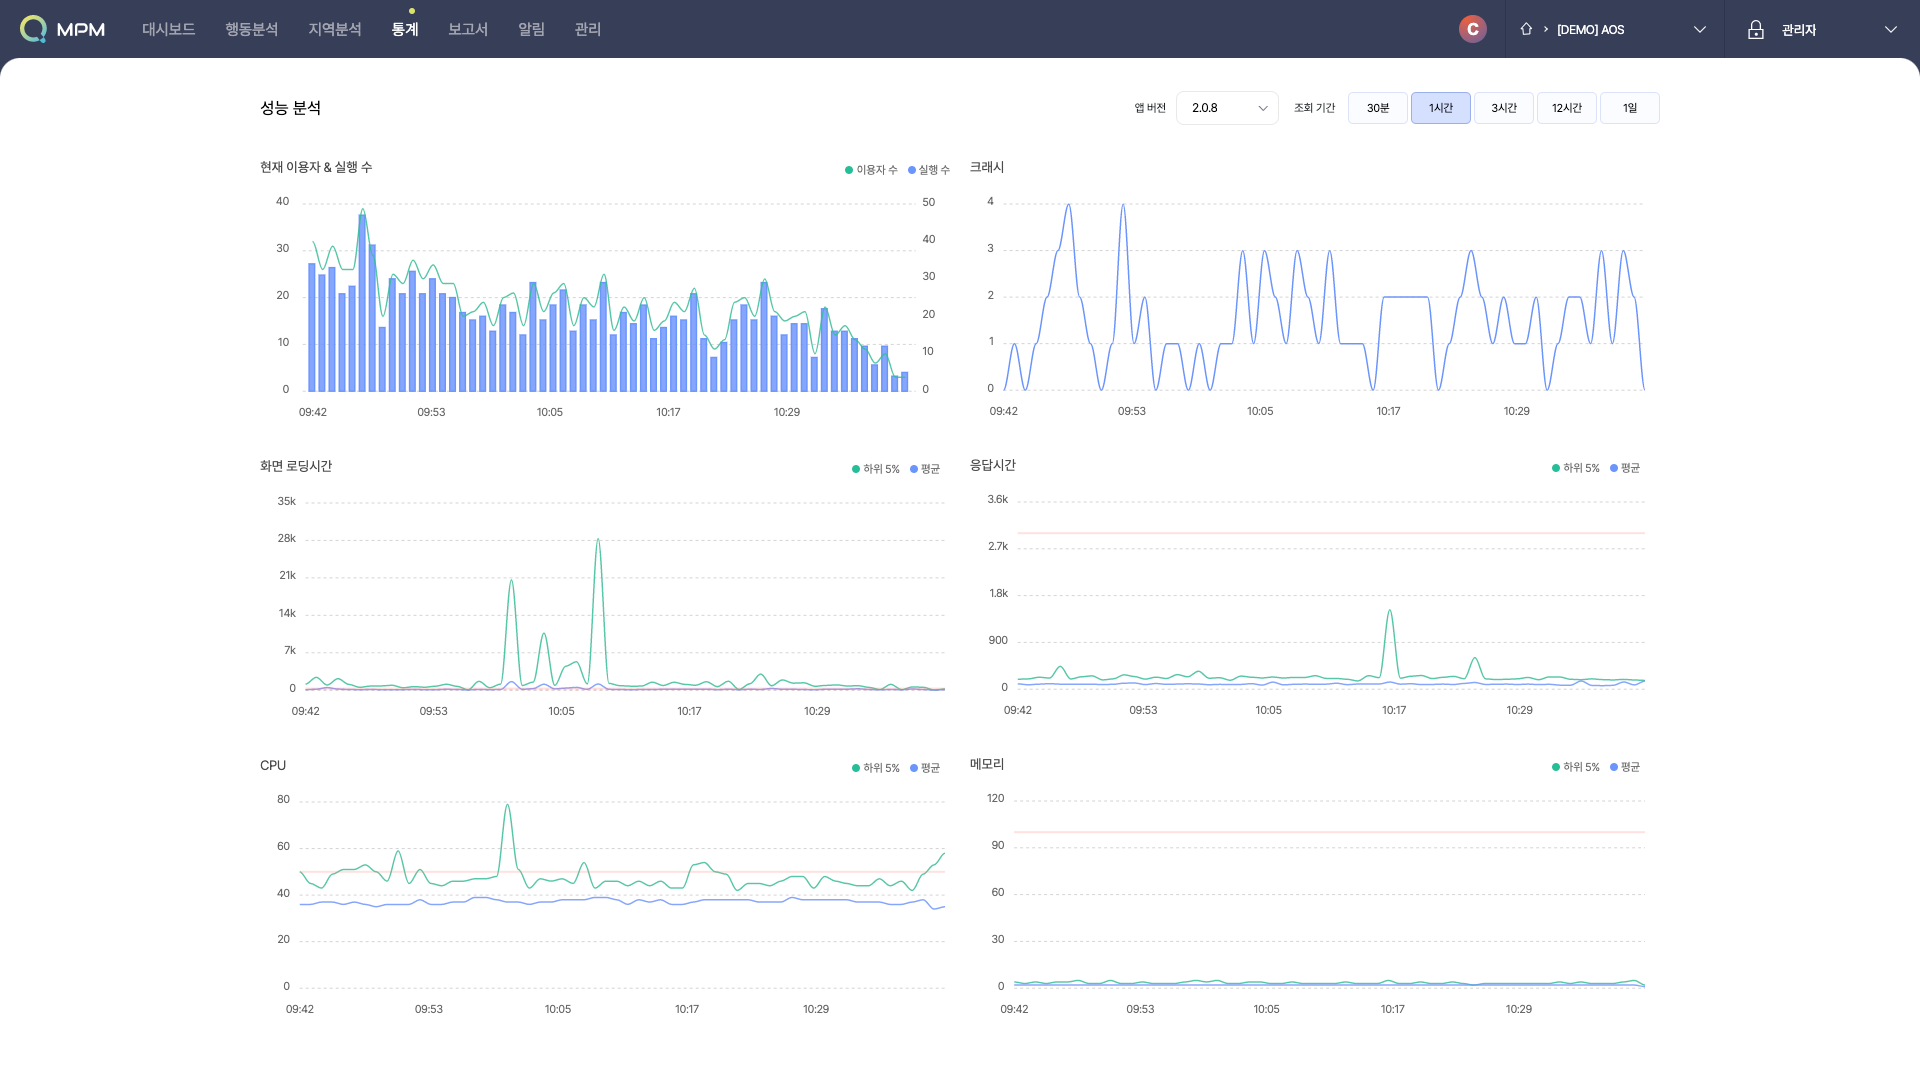
Displays the number of connectors/launches of all app versions and each performance index on a time-series graph. You can check the point of performance degradation and trends of performance changes from a macro perspective by changing the calculation section.

30 minutes: Displays performance for the past 30 minutes in a one-minute interval.
1 hour: Displays performance for the past 1 hour in a one-minute interval.
3 hours: Displays performance for the past 3 hours in a one-minute interval.
12 hours: Displays performance for the past 12 hours in a one-minute interval.
1 day: Displays performance for the past 24 hours in a one-minute interval.
3. Screen analysis
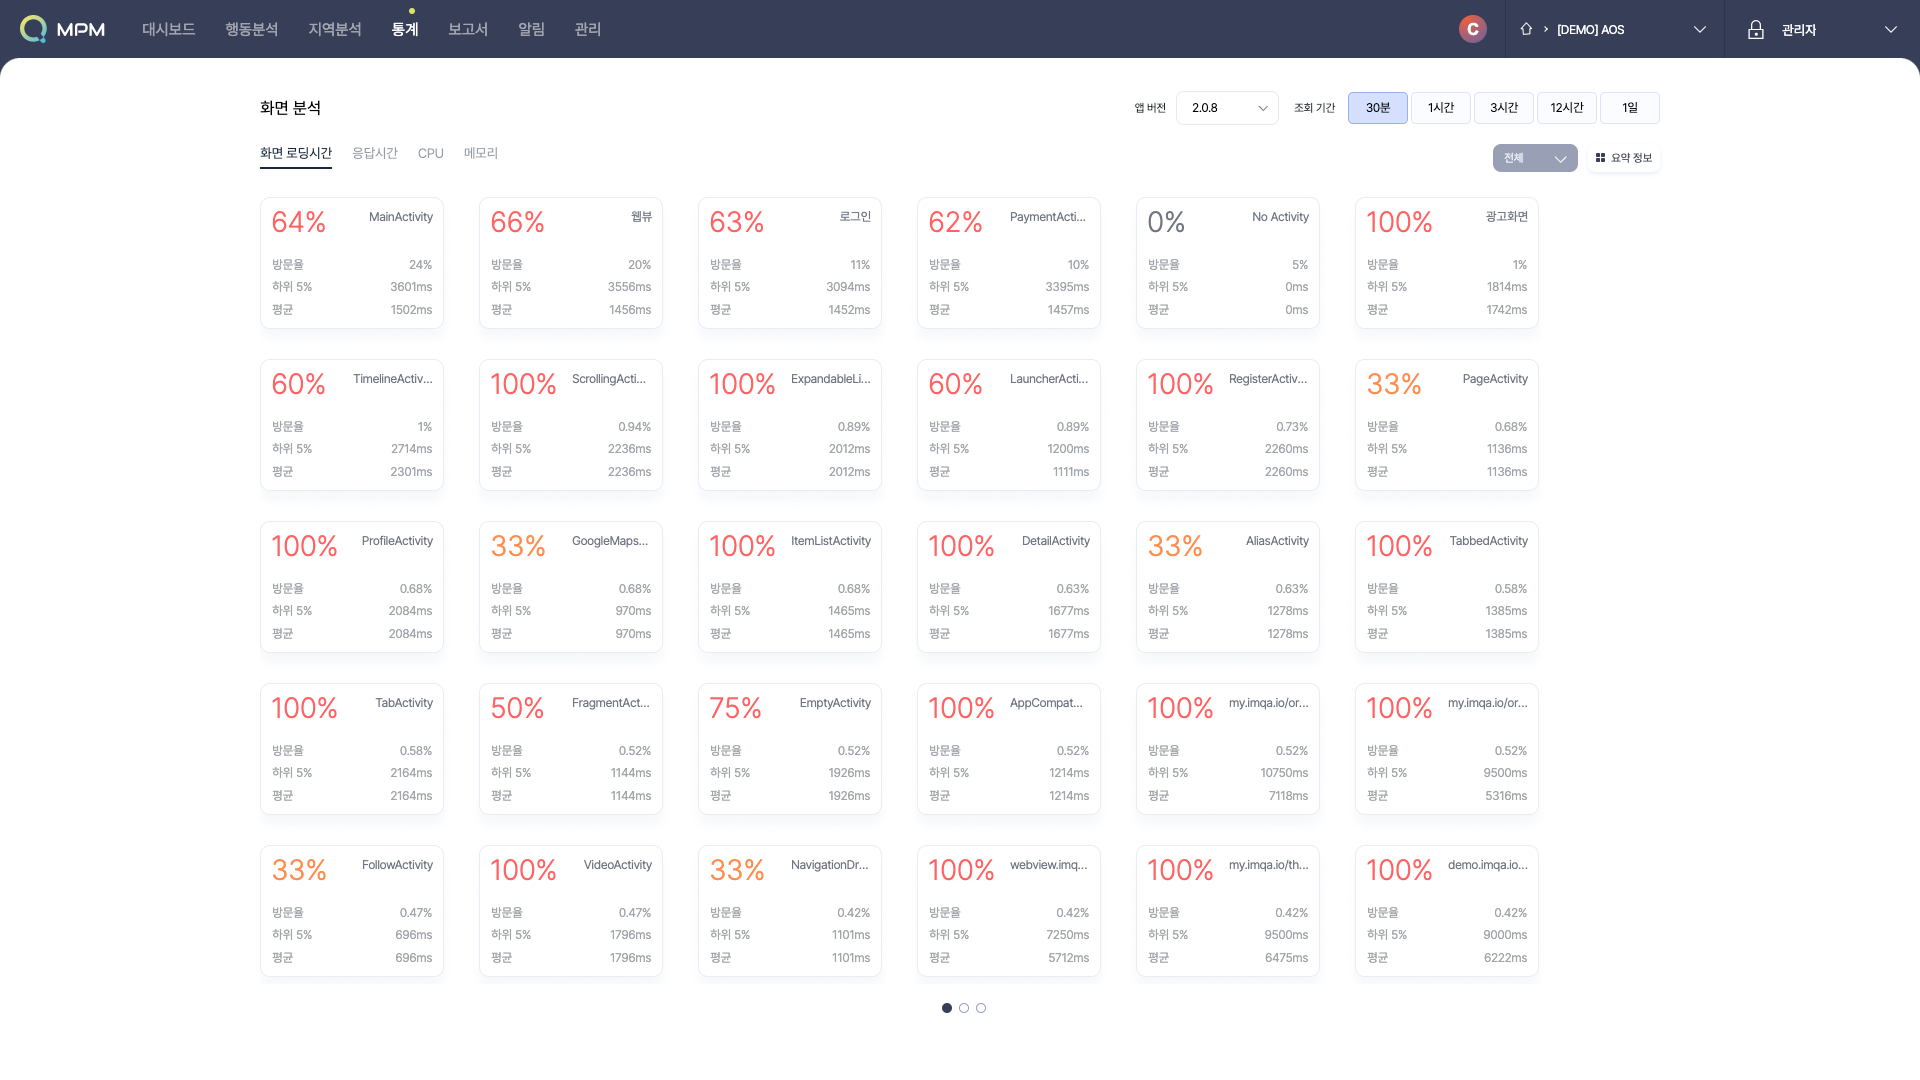
You can check the performance degradation of each screen at a glance by changing the calculation section of the rate of user visits, problem occurrence rate, bottom 5% and average of all app versions by performance index. The screen is sorted in the order of the highest visit rate. When you click on the screen card, the “Performance analysis by screen” page of the latest app version will be displayed.

For React Native projects, CPU and memory performance indicators in screen analysis are displayed centered on native data. The component screen card display function and component-specific performance analysis function in the response time performance indicator will be updated in the future.
4. Performance statistics
Performance statistics allow you to check historical data about the performance experienced by users when using the app within a period. You can gain insight into app performance by searching statistics by subject for the desired period and conditions. You can check status and identify patterns from a macroscopic perspective.

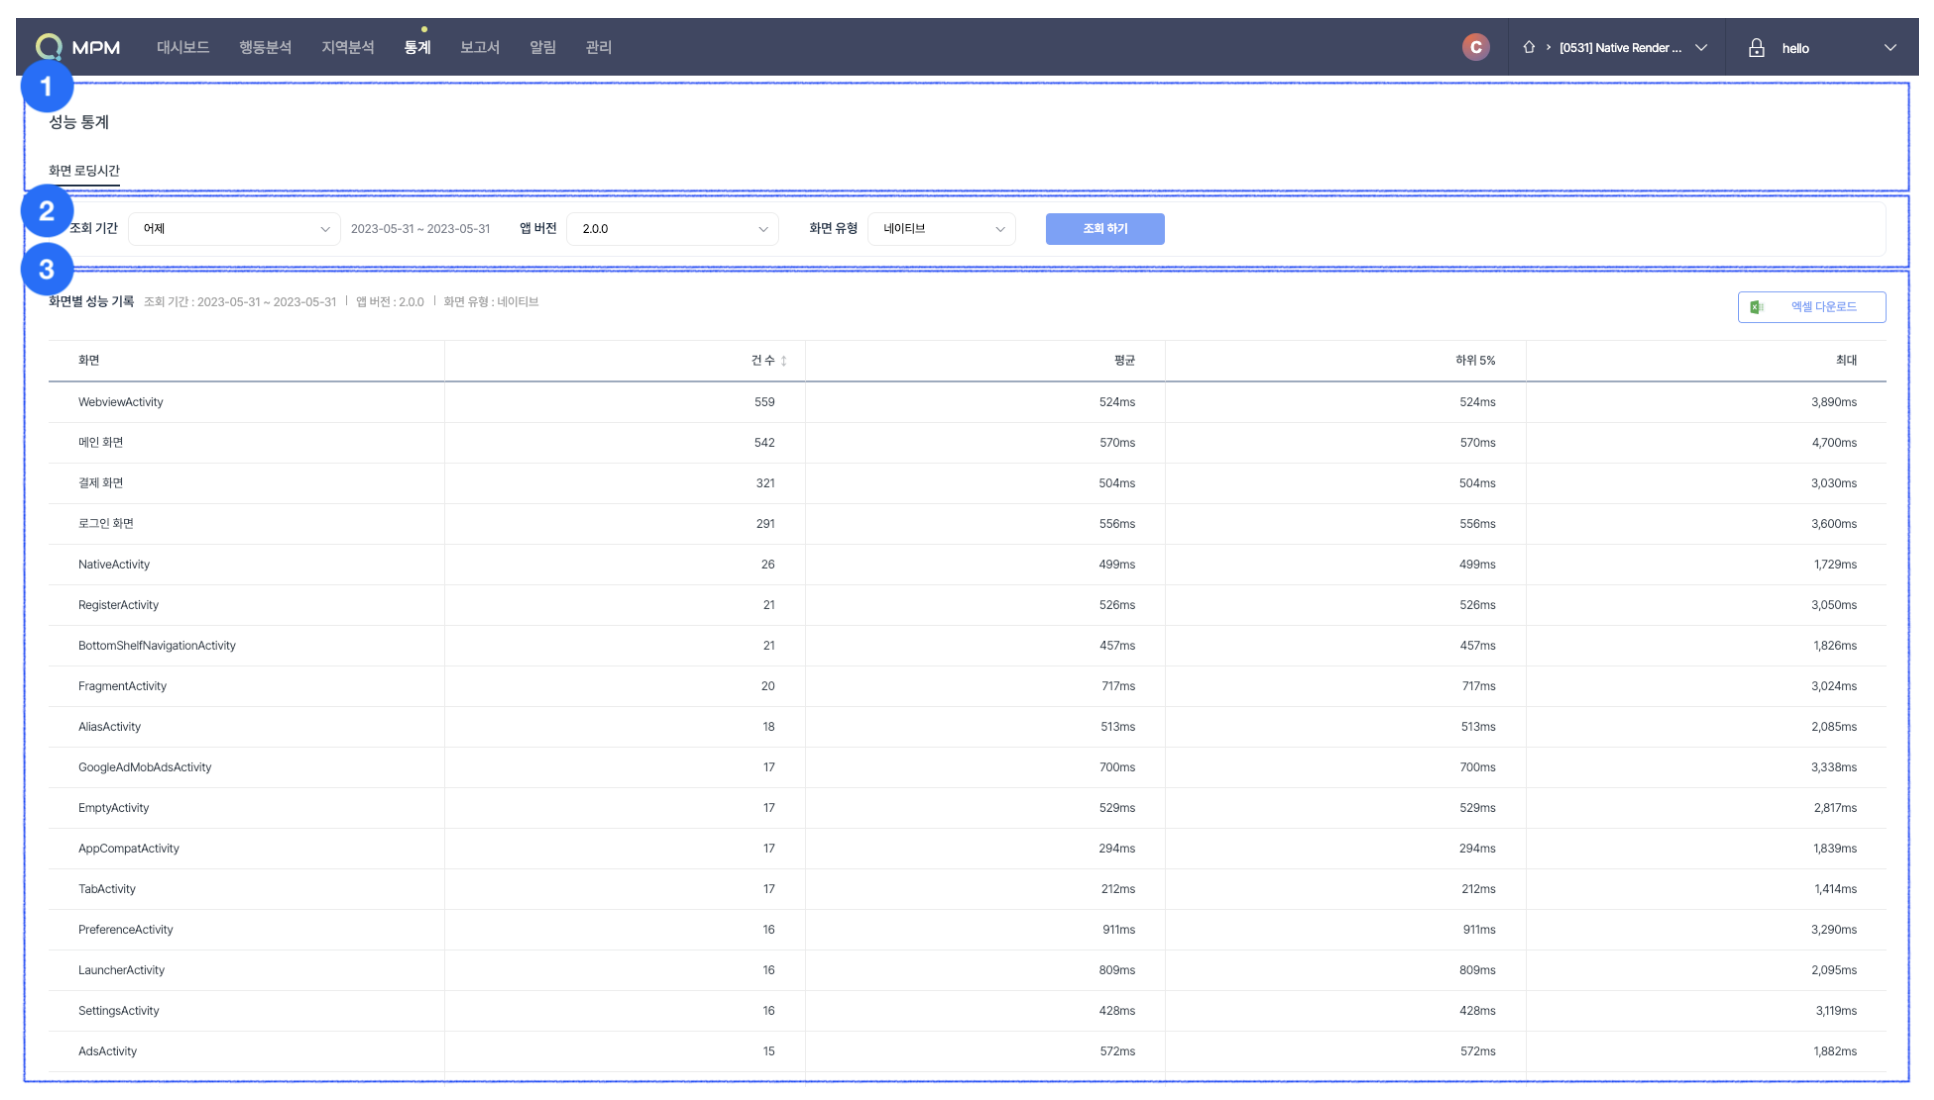
The IMQA MPM Performance statistics page consists of the following:
❶ Statistic Topic ❷ Data range / Search Condition ❸ Usage records by criteria
Statistic Topic
You can select a detailed subject to analyze previous data. You can analyze various statistic indexes according to the selected subject.

❶ Detailed subject of statistics You can modify the detailed subject of statistics. Upon changing an index, you can view the statistics index for the corresponding subject.
You can view the statistics of app usage history from the current user statistics. Statistics on more subjects will be provided in the future.
Data Range/Search Condition
You can select a period or search condition. Data based on the selected period and condition are retrieved.

Select the period for the retrieval. It is set to ‘Yesterday’ by default. You can choose from ‘Yesterday’ and ‘1 day’.
Select an app version to search for. It is set to ‘app versions with the highest priority’ by default.
Select the screen type you want to view. It is set to ‘Native’ by default, and selectable screen types are displayed depending on the app type and platform selected when creating the project. For web/hybrid apps, you can additionally select the screen type as ‘Native’ or ‘Webview’, and for Android apps, you can select ‘Fragment’.
Click [Search] to retrieve data based on the selected period and condition.
Screen Usage
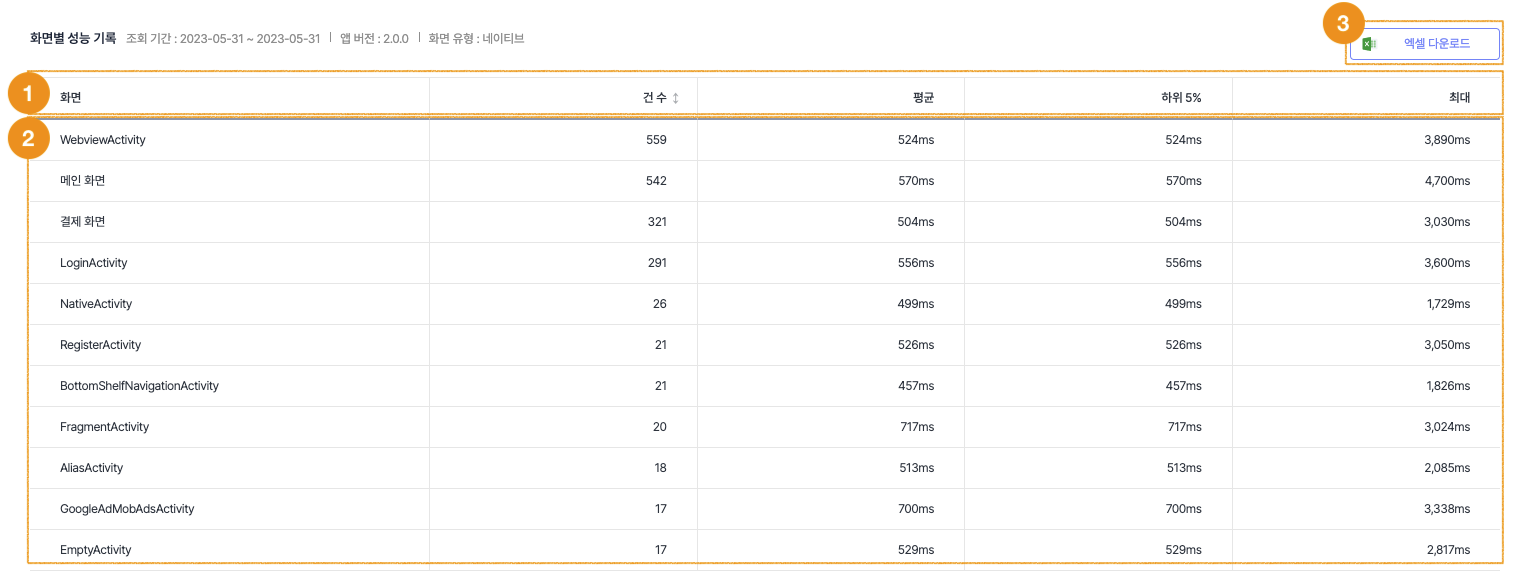
Native and WebView screens visited by users of the app version corresponding to the inquiry period and conditions are displayed. The default order is by the highest number of data. You can view the screen information, user count and view count.

❶ Header(sort) The default order is by the highest number of data. You can also sort by the lowest number of data.
❷ Performance records for each screen Displays screen information, number of performance data for each screen, average, bottom 5%, and maximum value.
Screen: Displays the names of Native, WebView, and fragment screens. If the screen name is too long, hover the mouse over the name to display the full name as a tooltip
The number of cases: Counts the number of loading time data for the relevant screen during the data range.
Average: Calculate the average loading time of the entire screen during the data range.
Bottom 5%: Calculate the average loading time of the bottom 5% of screens during the data range.
Max: Displays the maximum value of the loading time during the data range.
Through the performance records for each screen, you can check the most visited and least visited screens, average performance, bottom 5% performance, and maximum performance value during the data range. Check the usage by the top/lowest visited screen and utilize it as a performance improvement index.
❸ Excel download You can save the query results as a .xlsx file. Click [Excel download] to save the ‘[IMQA_STATS]Project Name_Ver.App Version_Statistics Topic-Indicator Name-Screen Type_View Period.xlsx’ file in the ‘Download’ folder.
5. User Statistics
You can check a user’s previous data on app usage within a specific period from the User Statistics. You can inquire by period and conditions and get insights regarding app users through statistics by subject. You can check the status or identify patterns from a macroscopic perspective.
Currently, user statistics in React Native projects are displayed natively and data-driven. The option to choose Component-specific Performance Analytics will be introduced soon.
The IMQA MPM User statistic page consists of the following:
❶ Statistic Topic ❷ Data range / Search Condition ❸ Summary ❹ Usage records by criteria
Statistic Topic
You can select a detailed subject to analyze previous data. You can analyze various statistic indexes according to the selected subject.
❶ Detailed subject of statistics You can modify the detailed subject of statistics. Upon changing an index, you can view the statistics index for the corresponding subject.
You can view the statistics of app usage history from the current user statistics. Statistics on more subjects will be provided in the future.
Data Range/Search Condition
You can select a period or search condition. Data based on the selected period and condition are retrieved.
Select the period for the retrieval. It is set to ‘Last 7 days’ by default. You can choose from ‘Today’, ‘Yesterday’, and ‘Last 7 days’.
Select an app version to search for. It is set to ‘app versions with the highest priority’ by default.
Click [Search] to retrieve data based on the selected period and condition.
Summary - Users & Runs by date
This is the summary of app usage history. Daily user count and run count are represented by a heat map on the monthly calendar. Here shows the data density.
Display criteria: Select the condition for the retrieval. It is set to ‘user count’ by default. Available options are ‘user count’ and ‘run count’. When changed, the heat map on the monthly calendar is updated.
Daily Avg: The user count and run count within the retrieved period are calculated into a daily average.
Range Total: Calculates the totals for the retrieved period.
Legend: You can view the maximum and the minimum user count and run count within the retrieved period.
Monthly calendar heat map: The daily user count and run count are visualized as a heat map on the monthly calendar. You can quickly view the figures as they are differentiated by four colors based on the maximum and the minimum numbers.
Through the monthly calendar heat map, you can quickly check the app usage status on which days the users and the number of runs.
Summary - Top 5 Screens by usage
This shows the summary of app usage history. You can view the top 5 screens with the highest views and visitors. The default order is by the highest number of visitors and views on Native and WebView screens. You can view the screen information, user count and view count.
Visitors: Counts the number of users who have visited the screen. The count refers to the number of users alone, excluding duplicates.
Views: Counts the number of visits for the screen.
Check the usage by the top/lowest visited screen and utilize it as a performance improvement index.
Users & Runs by app version
You can view the user count and run count of each app version that corresponds to the retrieved period and conditions.
❶ Header(sort) The default order is by the highest number of users. You can also sort by the lowest number of users.
❷ Total Displays the total user count and run count from the retrieved results.
❸ Users & Runs by App version Displays the app version, user count and run count for each version.
App Version: Displays the app version included in the search condition.
Users: Counts the number of users for the app version. The count refers to the number of users alone, excluding duplicates.
Run count: Counts the number of runs for the app version.
You can view the app versions used by users and duplicate run count during the retrieved period by referring to the user count and run count by versions. Check the usage of app versions here.
Displays the user count and run count by current versions for only one app version defined by the search condition. R&D is currently in progress to offer a feature that provides multiple app versions.
Users & Runs by Date
You can view the user count and run count per day that corresponds to the retrieved period and conditions.
❶ Header(sort) The default order is by dates in descending order. You can sort by dates in descending order.
❷ Total Displays the total user count and run count from the retrieved results.
❸ Users & Runs by Date Displays the daily user count and run count by date.
Date: Displays the dates included in the retrieved period.
Users: Counts the number of users by date. The count refers to the number of users alone, excluding duplicates.
Run count: Counts the number of runs by date.
You can view the dates in which the app was most used by users and duplicate run count during the retrieved period by referring to the daily user count and run count by versions. Observe the daily changes here.
Screen Usage
Native and WebView screens visited by users of the app version corresponding to the inquiry period and conditions are displayed. The default order is by the highest number of visitors. You can view the screen information, user count and view count.
❶ Header(sort) The default order is by the highest number of visitors. You can also sort by the lowest number of visitors.
❷ Total Displays the total user count and view count from the retrieved results.
❸ Screen usage Displays the screen information, user count, and view count.
Screen: Displays the names of Native and WebView screens. If the screen name is too long, hover the mouse over the name to display the full name as a tooltip.
Visitors: Counts the number of users who have visited the screen. The count refers to the number of users alone, excluding duplicates.
Views: Counts the number of visits for the screen.
You can view the screens with the highest and lowest number of visitors and the number of visits during the retrieved period by referring to the usage record by screens. Check the usage by the top/lowest visited screen and utilize it as a performance improvement index.
Last updated